Hole by Hole Tips
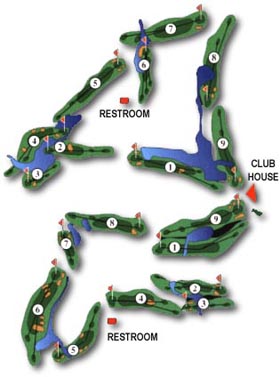
Click on a hole number below to see the layout
HOLE #1 – Par 5
474 460 413 Yards
The start hole is a dogleg right par 5. It is reachable in two for the longer hitters. A water hazard up the right side may come into play for some, coupled with out-of-bounds up the entire left side. A small creek, 145 yards short of the green, will become an obstacle for the average player. The green is very generous for all approach shots. Good opportunity get one up on the course to start the day.
HOLE #2 – Par 4
370 327 277 Yards
Accuracy is the key for this short par 4. Don’t let the water directly off the tee scare you, but be aware of the water up the right side. Knock your tee-ball right up the fairway and avoid out-of-bounds up the entire left side. An iron or fairway wood off the tee may be a smart play, especially for the longer player. The large green is very fair for all approach shots. Short irons allow you to hit it stiff and pick up an early stroke.

HOLE #3 – Par 3
208 198 134 Yards
The signature par 3 is a great hole that typically plays into our island breeze, so club selection is key. The devilish water short and right of the green add to the challenge. The green is fairly generous, only protected by a bunker short and right. Play towards the left or center of the green and avoid all the danger. Par is a great score here.

HOLE #4 – Par 4
380 364 312 Yards
Grip it and Rip it! Take advantage of this short par 4. There is plenty of room off the tee, besides out-of-bounds on both sides, that shouldn’t come into play. This hole is everyone’s chance to pick up a shot.

HOLE #5 – Par 4
405 396 336 Yards
The second hardest hole on the property offers a true test to all players. The tee shot is very important for this sharp dogleg right. Frightening out-of-bounds coupled with wicked bunkers on both sides, makes your tee shot extremely difficult. A hidden creek could catch some balls 100 yards short of the green. Don’t get discouraged here, especially where par is a great score.
HOLE #6 – Par 5
510 502 404 Yards
This long par 5 is a true three shot hole. Bunkers and lateral hazards on the right side protect the slight dogleg right. You guessed it, out-of-bounds runs up the complete left side. Bunkers also protect the narrow green. make your second shot count. Lay up to the 150 yard post to avoid the fairway bunkers and attack on your third shot.
HOLE #7 – Par 3
150 142 131 Yards
The 7th hole is a very short par 3 with a bag of tricks. The shallow green is bunkered with sand traps on both sides. This hole has some tricky winds rewarding the knockdown shot. A tip from the wise is to look back at the flag on the sixth green for your wind direction. Keep it low and play to the center of the green.

HOLE #8 – Par 4
380 367 312 Yards
This straightaway par 4 offers a reward to the player who keeps their tee shot up the middle or slightly right. Once again, out-of-bounds restricts both sides, but there is plenty of room out there. The deep green is very deceptive with a bunker short and right.

HOLE #9 – Par 4
388 380 319 Yards
The closing hole on the front is a par 4 heading towards the clubhouse. The large pond on the right side will be intimidating; considering it can be reached from all tee positions. Out-of-bounds runs up the left towards a well-bunkered green. The green slopes from back to front rewarding most approach shots, except for those into the dining room.

HOLE #10 – Par 5
541 534 413 Yards
Another test of length and strength, for this three shot par 5 that characteristically plays into our famous island breezes. The fairway bunker should never be challenged. Keep your tee shot in the fairway and split the trees, on both sides of the fairway, on your second shot. The water 40 yards short of the green and numerous bunkers turn this green into a real dartboard. Par for any player is a great score.

HOLE #11 – Par 4
330 316 285 Yards
This short par 4 should not be taken for granted. Danger is lurking around every corner. The fairway bunker can be cleared, but long hitters can also reach the water 280 yards off the tee. Your approach shots are challenged by a severely sloping green surrounded by water.
HOLE #12 – Par 3
192 164 146 Yards
This fairly long par 3 has a two level green, which creates an advantage depending which level you reside. Bunkers and mounds, garnished with water short and right, surround the green. Your best play is left and long to avoid any danger.

HOLE #13 – Par 4
369 350 266 Yards
How brave are you? This heroic hole is a slight dogleg right, posing a difficult question on the tee. A long iron or fairway wood up the left side is your best bet. Water runs up the right side and bunkers guard the left side. The undulating green is also protected by water along the left with a large bunker on the right.
HOLE #14 – Par 4
416 373 316 Yards
Hit it over 200 yards to a wide landing area on this straightaway par 4. Out-of-bounds guards the left and right, making a long iron or fairway wood off the tee a smart play. Your second shot is more difficult considering the small two-tier green peppered with bunkers.
HOLE #15 – Par 3
178 167 146 Yards
Just get on the dance floor! This is the final par 3 and requires pinpoint accuracy to make it on the putting surface. The green is deep and narrow, but thoroughly protected by water, bunkers and a lateral hazard on every side. A slight miss right is acceptable, but difficult to save par.
HOLE #16 – Par 4
363 324 272 Yards
This par 4 is home to the toughest green on the course. The best tee shot is to the right side of the fairway, from here you will have the best chance of getting your approach shot on the green. The severe slope of this green can humble even the best putters.
HOLE #17 – Par 4
420 410 320 Yards
The #1 handicap hole at “The Links” is that for a reason. A slight dogleg to the left, with a hidden tee shot. Keep in mind, there is water sitting at about 240 yards from the tee. Play your tee shot over the right mound and keep it straight, that will provide you with the best angle into the green. The green is protected by a sand trap on the left, grass bunker an the right and trees long.
Hole #18 – Par 5
450 440 380 Yards
Take advantage of the closer! Not a long par 5, but not easy either. The best tee ball is played out to the right, steer clear of the waste area on the left. Watch the creek that sits 120 yards from the green, it will eat you up. For the big hitters, this can be a relatively short hole. A large green is receptive, but play enough club, because it is elevated. Beware of the fescue and bunkers protecting this finishing hole. This is your last chance to pick up a stroke on the course.